Blog · Measurement
How to Measure Your Vent Opening
A homeowner’s working method for measuring the duct or wall opening before you order a decorative vent cover. Tape the clear opening — not the outer face of the old grille — then match the closest SOKNOCKK catalog size.
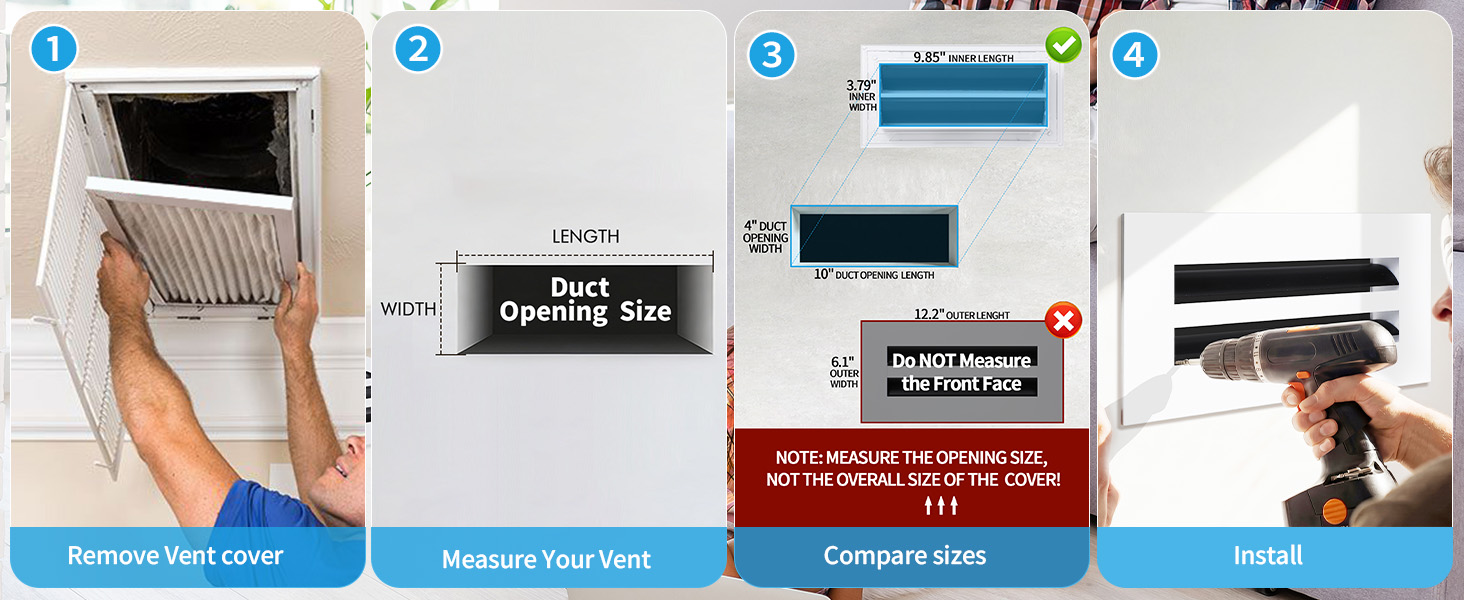
Quick Answer
Homeowners often search “how to measure vent covers” — what you actually measure is the
vent opening (clear duct/wall/floor cut), not the outer decorative face of the old cover.
Remove or carefully work around the old cover, measure inside width × height of the opening in inches, write the numbers down, then compare to Confirmed catalog sizes. Do not order from the outer trim alone. Finish (White/Black) comes after size.
- Opening size drives fit; stamped labels are clues only.
- Use the size-specific How-to-Measure graphic on Confirmed product pages as a second check.
- Shop Confirmed rows on Vent Covers — Pending pairs are not a public buy path here.
1. Why Opening Size Comes First
A decorative vent cover has to seat over a rectangular cut in drywall, plaster, or a metal boot. If you buy from the outer frame of an old grille, you often land in the wrong size family — a cover that looks “close” in a photo but leaves gaps, overhangs oddly, or will not seat flush.
SOKNOCKK catalogs covers by opening-size families (for example 6×4, 10×6, 16×4, 24×4). Those numbers describe the size family you are trying to match. Color is a separate finish choice and does not change the opening geometry — see White and Black FAQ.
This article is general residential DIY guidance. It is not a duct-design manual and does not claim code compliance for a specific house.
2. What to Prepare
| Item | Why it helps |
|---|---|
| Tape measure (inch markings) | Primary reading of clear width and height |
| Notepad or phone note | Capture width × height without relying on memory |
| Screwdriver / bit driver | Remove the old cover when safe |
| Small parts cup | Hold screws so they do not fall into the duct |
| Phone camera | Photo of opening + tape; photo of any stamped label |
| Step stool / helper (ceilings) | Support the face before last fasteners loosen |
Shut the system off if debris or fasteners could fall into the duct. For ceiling removal technique, see How to Replace a Vent Cover.
3. Duct Opening vs Outer Frame
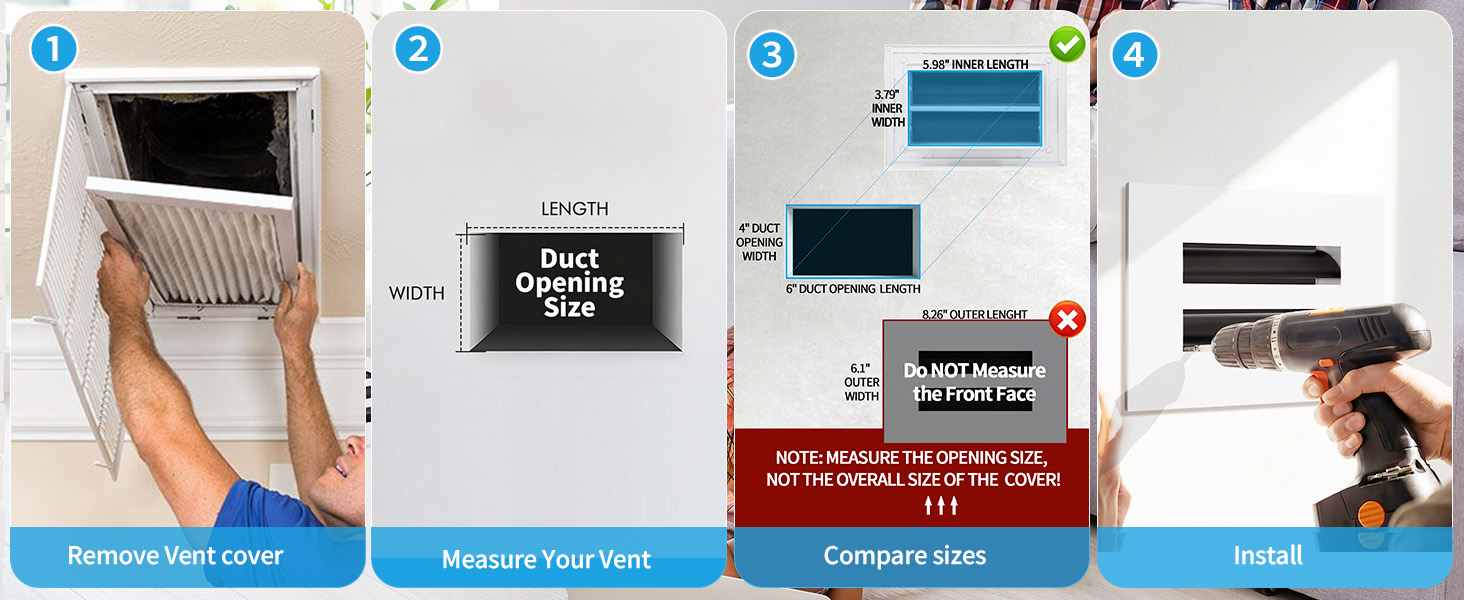
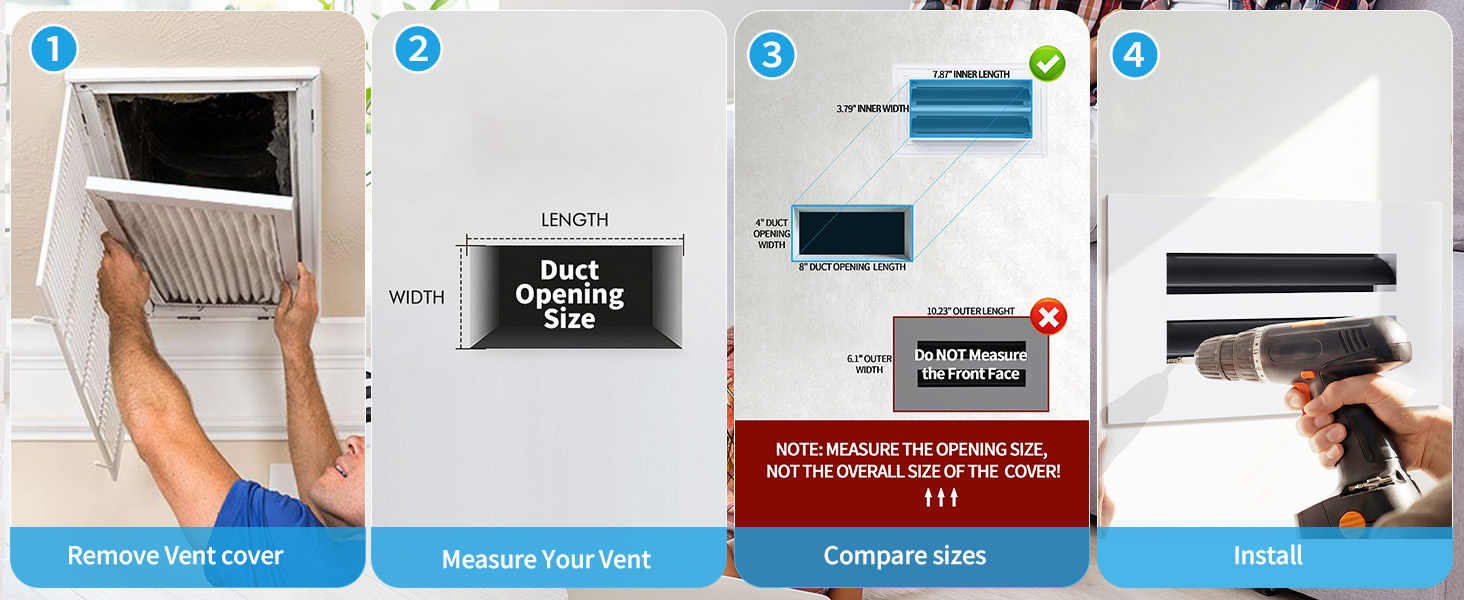
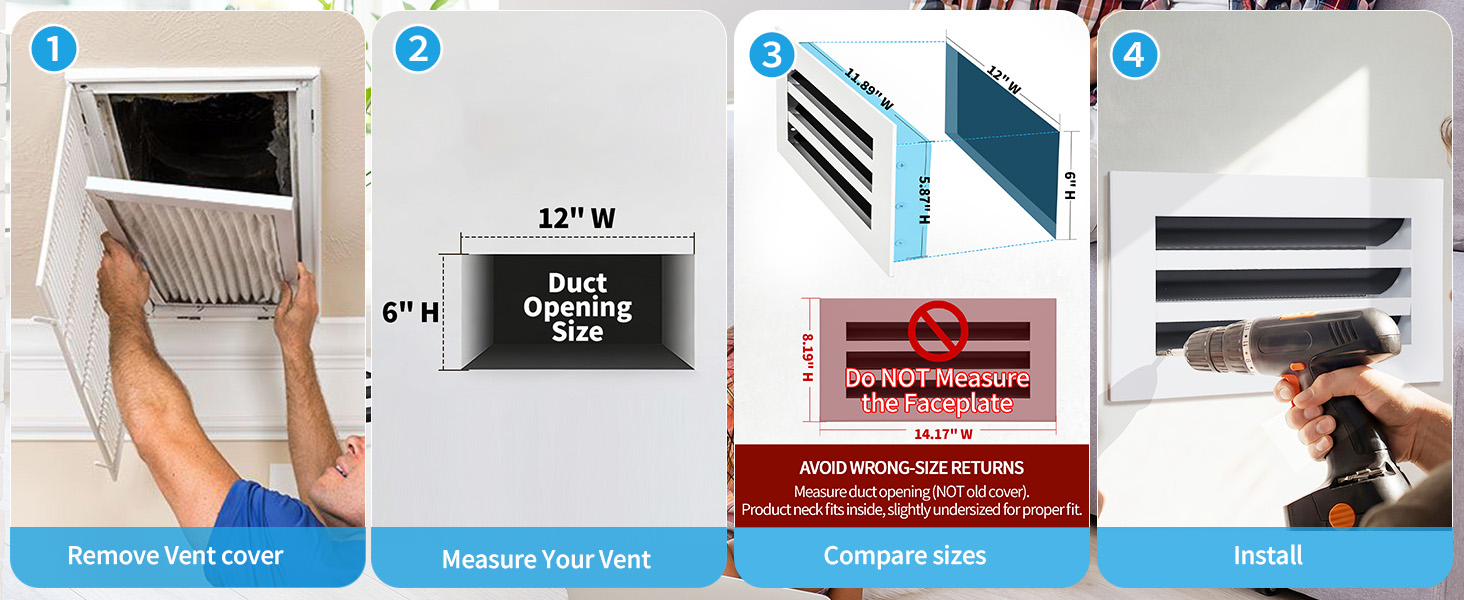
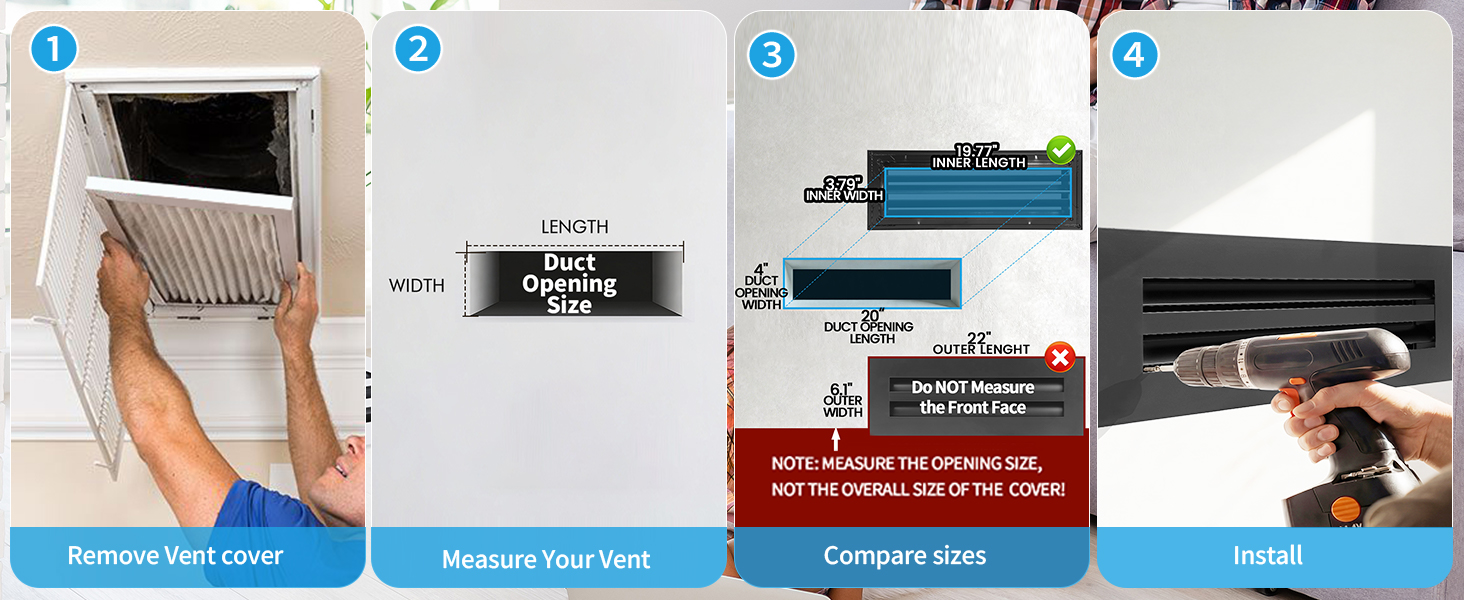
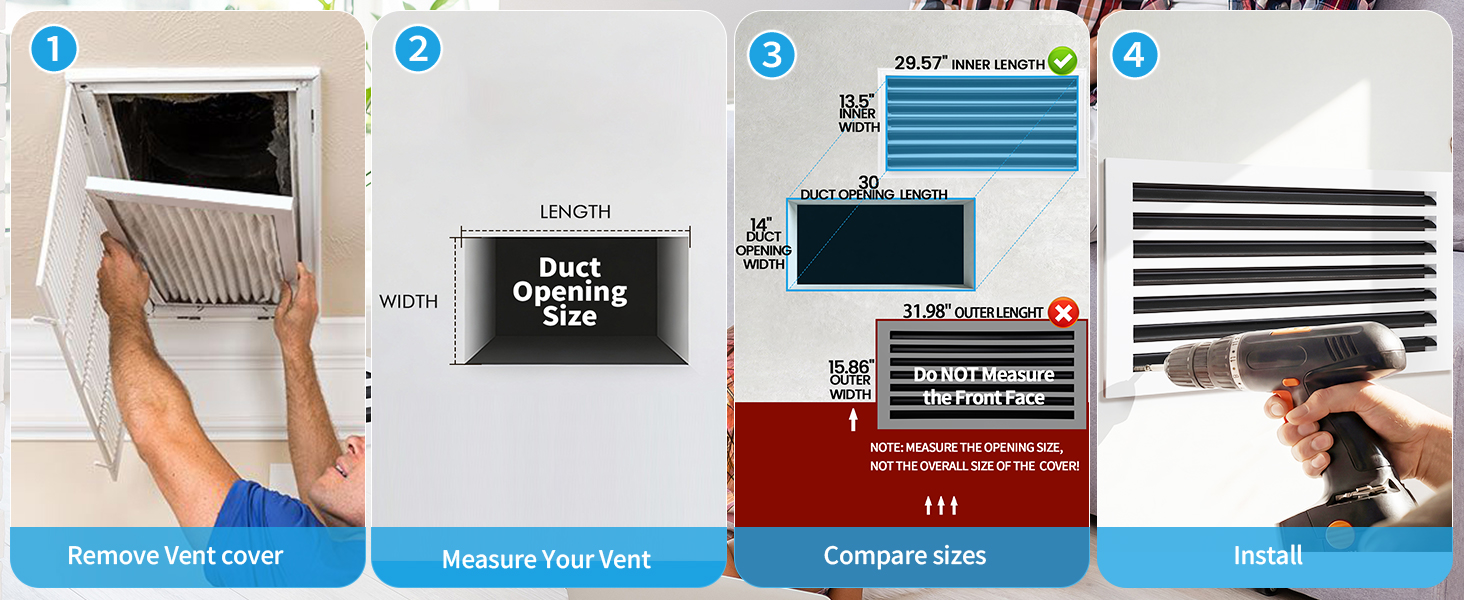
Duct / wall opening is the clear rectangle the new cover must fit — the hole you see after the old face is off (or carefully worked around). Outer frame is the decorative perimeter of the old grille. The frame is almost always larger than the opening.
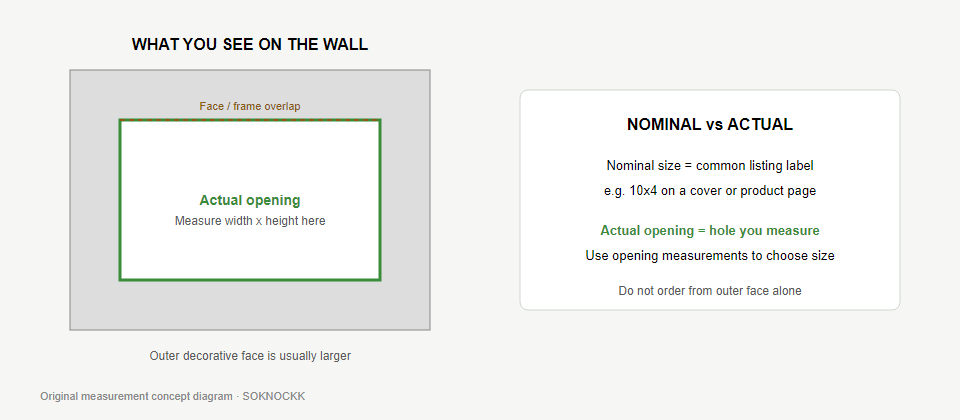
| Measure this | Skip as primary |
|---|---|
| Inside clear width of the hole | Outer flange tip-to-tip |
| Inside clear height of the hole | Overall decorative face height |
| Smallest clear dimensions if out of square | “Looks like 10×4” from across the room |
4. Step-by-Step Measurement
Step A — Expose the opening
Remove the existing cover when you can do so safely. If paint seals the perimeter, score lightly so you do not tear drywall paper. Keep fasteners in a cup.
Step B — Measure width
Seat the tape on the clear rectangle. Record inside width in inches. Avoid riding the tape on loose insulation or bent metal lips that do not represent the finished opening.
Step C — Measure height
Measure inside height the same way. Write both numbers as width × height (example: 10 × 4).
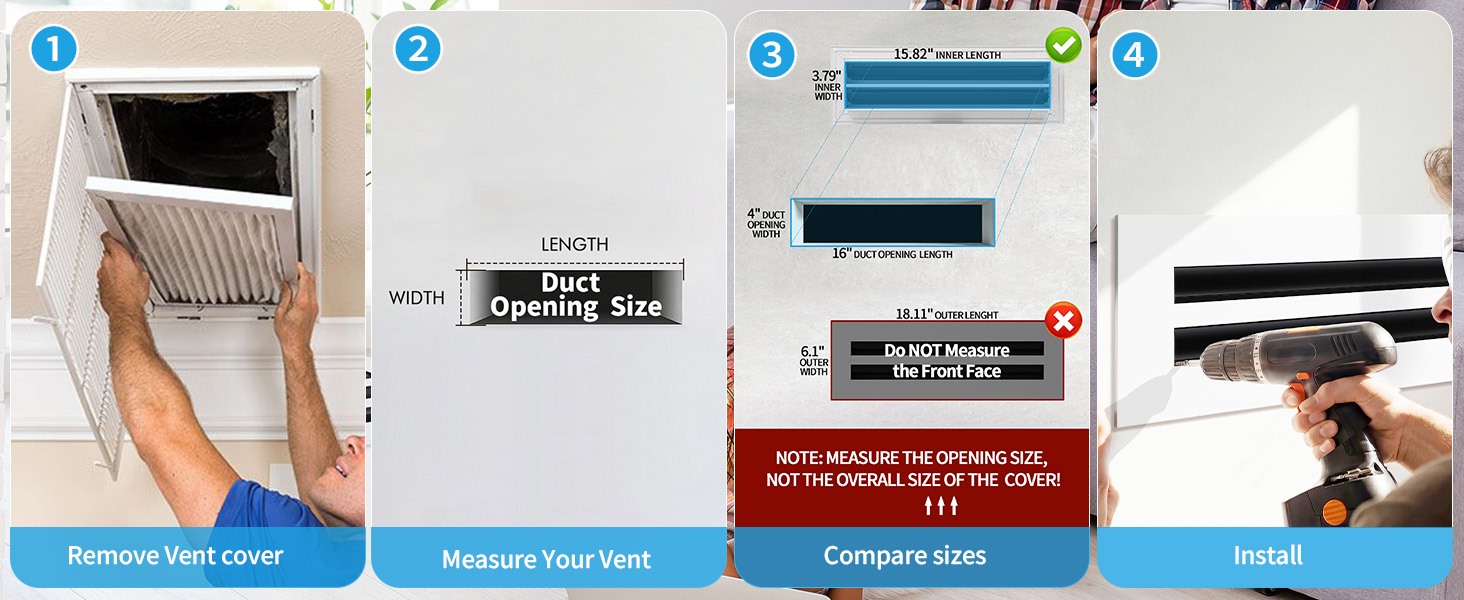
Step D — Spot-check
Measure twice. If the opening is out of square, note the smallest clear dimension in each direction — that is what the new cover must clear.
5. Wall, Ceiling, and Tight Spots
Wall openings
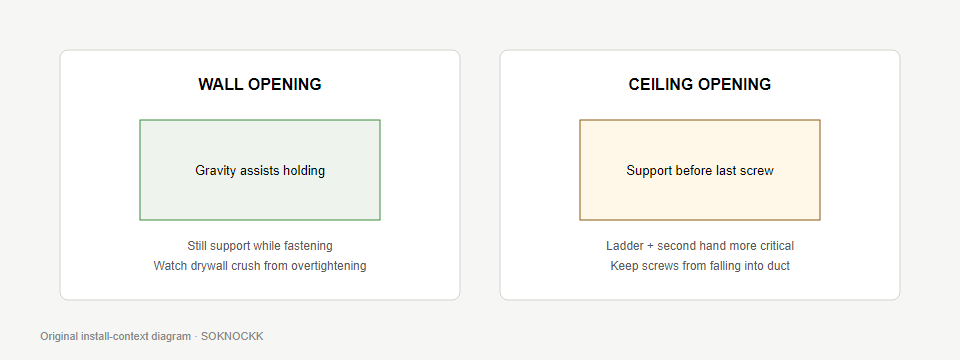
Usually easier access. Still square the tape to the opening edges, not to nearby baseboard or chair rail that can skew the reading.
Ceiling openings
The measuring method does not change, but removal does. Support the cover before the last fastener loosens. Use a stable ladder — not stacked furniture. If you cannot reach safely, stop and get local help.
Floor openings (measurement notes)
Floor registers use the same width × height tape method on the clear opening as wall and ceiling locations.
Extra care when measuring: keep debris out of the boot, watch for carpet or flooring edges that hide the true opening,
and do not order from the outer floor-grille flange alone. If the boot lip is damaged or out of square, photograph before shopping.
Product suitability:
These notes explain how to measure a floor opening. They do not claim that every SOKNOCKK cover is intended for floor traffic,
walk-over use, or load-bearing duty. Confirm the intended location and listing details for the Size+Color you are considering
(and prefer category guidance on Vent Covers / the specific product page) before ordering.
Tight furniture or cabinetry
Photograph first. If you can only sneak a tape behind a face without removal, treat that reading as provisional and re-measure after a safe removal when possible.
6. Nominal Size vs Actual Opening
Nominal size is the industry-style label you may see stamped on an old register (for example “10×4”). Actual opening size is what your tape measures on site. Labels name a size family; they do not guarantee your drywall cut is exactly those inches.
Workflow: write the tape reading first, note the old label second, then compare to SOKNOCKK catalog rows. If label and tape disagree widely, photograph both and ask before ordering. Deeper resource: Nominal Size vs Actual Opening Size.
7. Worked Measurement Examples
These examples are educational. They show how to think — they are not a promise that your house matches these numbers.
| Old label | Tape reading | Practical next step |
|---|---|---|
| 10×4 | ~10 × 4 | Shop 10×4 Confirmed rows; confirm finish after |
| 10×4 | ~9.6 × 3.9 | Still compare to 10×4; photo-check fit concerns |
| 12×6 | ~16 × 4 | Do not force the label — shop the tape family |
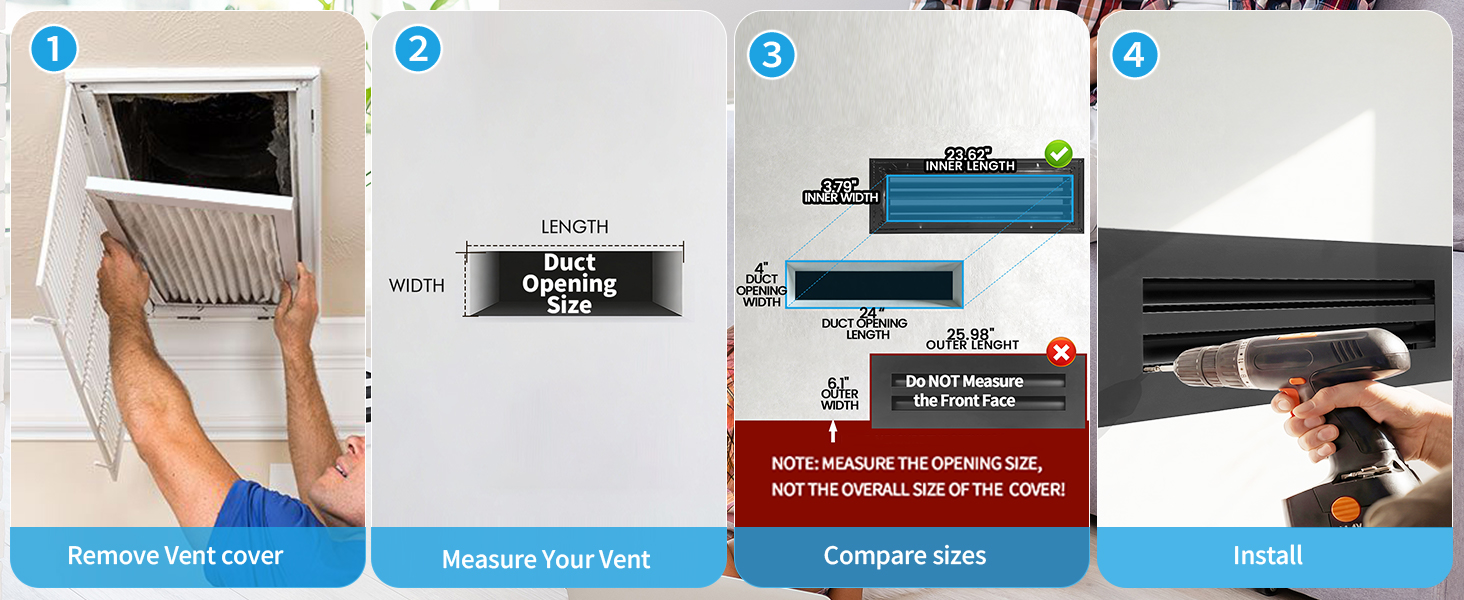
| (none) | ~24 × 4 | Shop 24×4; use product How-to-Measure module |
| 8×4 | ~8 × 4 | Shop 8×4 Confirmed; White/Black independent |
8. Common Mistakes and Fixes
| Mistake | What goes wrong | Fix |
|---|---|---|
| Measuring the outer face | Wrong size family | Measure the clear opening |
| Trusting only a stamped label | Nominal ≠ your cut | Tape first, label second |
| Skipping removal on painted covers | Tape rides on trim | Expose opening when safe |
| Mixing width/height order | Wrong catalog row | Write width × height clearly |
| Choosing color before size | Shopping by mood photo | Size lock, then finish |
| Rounding up “to be safe” | Cover that will not seat | Ask with photos if between sizes |
9. Using the Reading to Pick a SOKNOCKK Size
- Find the catalog size closest to your measured opening.
- Open that size on Vent Covers.
- On Confirmed product pages, compare the size-specific How-to-Measure module to your notes.
- Choose White or Black only after size is settled (Choose Size and Color Independently).
- Buy only Confirmed Size+Color rows (BUY ON AMAZON). Pending rows are not a public purchase path on this site.
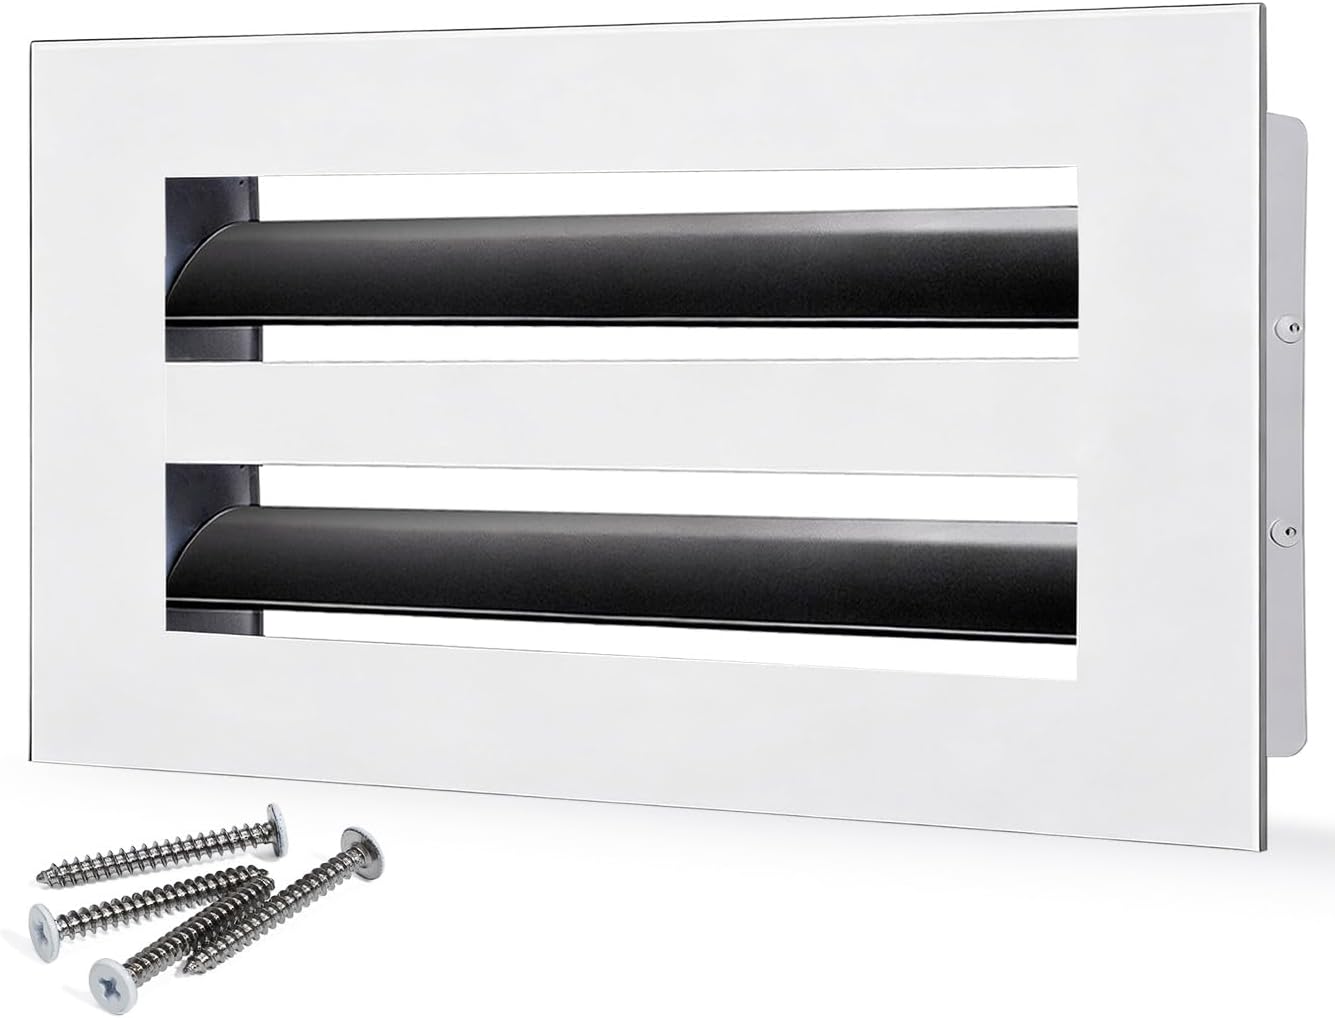
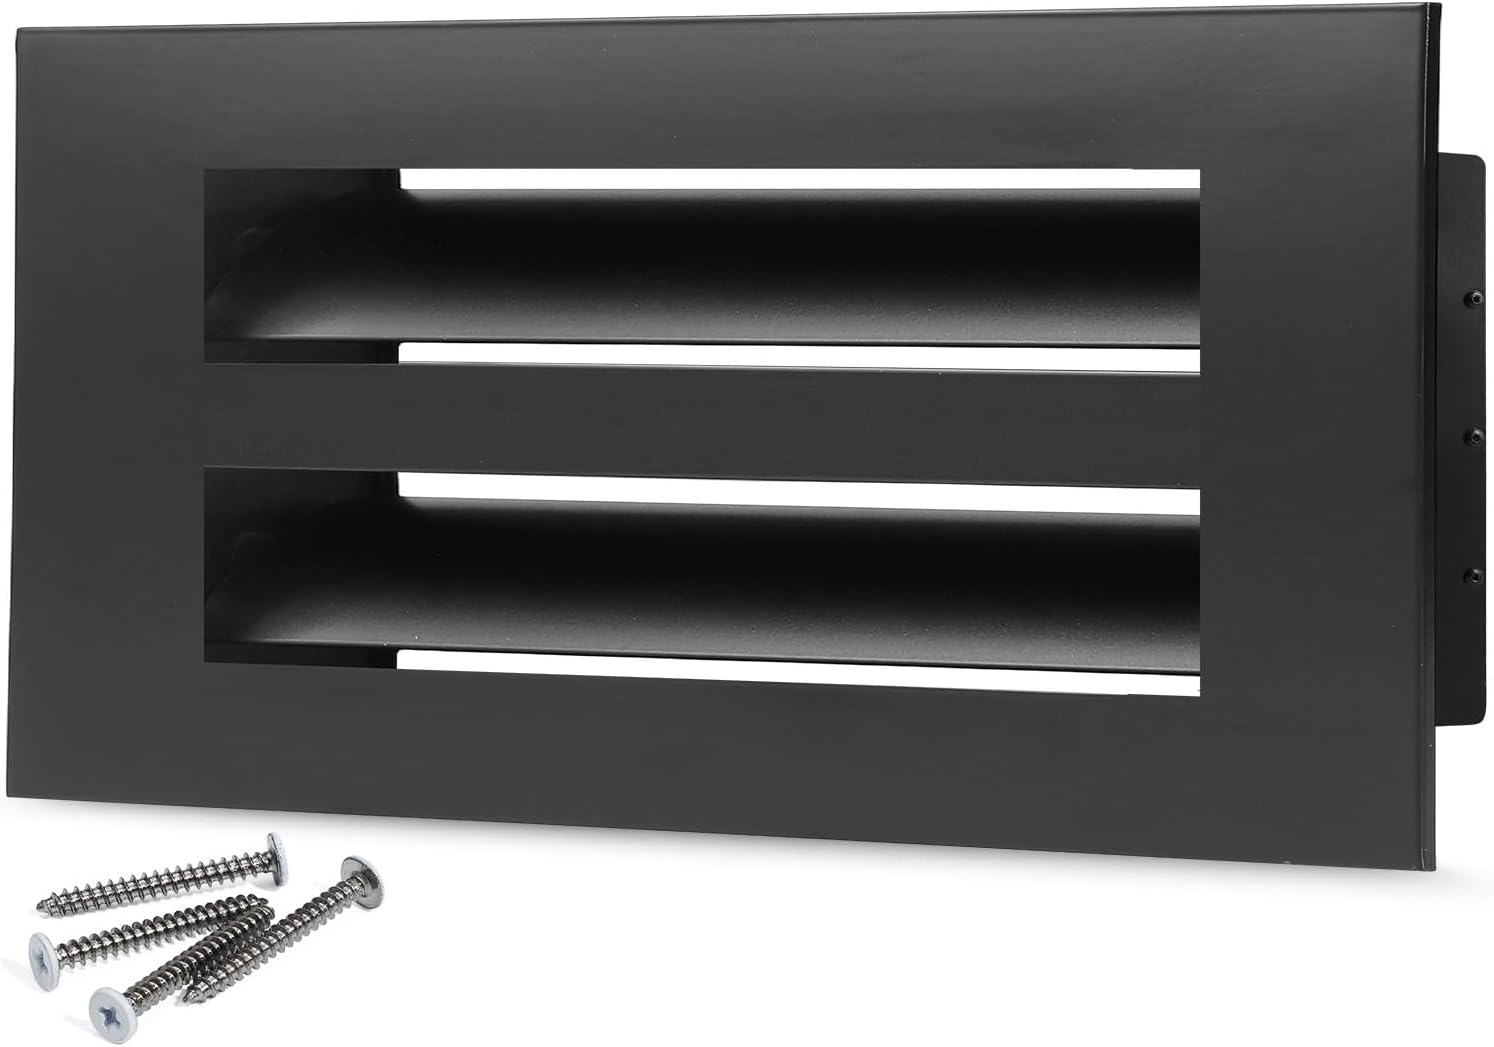
Confirmed listings use photography and How-to-Measure assets mapped to Size+Color. Photos still do not replace your tape reading — see Are product images exact for every size?
10. Non-Standard Openings
Stop and get help (local contractor or a SOKNOCKK quote request) when:
- The opening is clearly non-rectangular, crushed, or ovalized.
- Drywall edges crumble when you touch them.
- Your tape sits between two catalog families with no clean match.
- You cannot safely support a ceiling cover.
Send width × height, room location, finish preference, and photos through Contact, Add to Quote, or Business Inquiry. Quotes support specification — they do not replace Confirmed Amazon checkout when a mapped ASIN exists.
11. Field Checklist
- □ System considered safe for removal
- □ Opening exposed
- □ Width measured twice
- □ Height measured twice
- □ Written as width × height (inches)
- □ Old label noted (if any)
- □ Photos saved (opening + tape)
- □ Candidate catalog size listed
- □ Finish chosen after size
- □ Variation status Confirmed before purchase
Printable companion: Measure the Duct Opening First.
12. Short FAQ
Can I measure without removing the cover?
Sometimes — but painted or tight faces often force a wrong reading. Removal is the reliable method when safe.
Does ceiling vs wall change the numbers I write?
No. You still write clear width × height. Ceiling work mainly changes handling safety.
What if I am between two sizes?
Do not round up blindly. Photograph the opening and ask before ordering.
Is “how to measure vent covers” the same as measuring the opening?
Yes in practice. You size a cover by measuring the clear opening it must seat over — not the outer trim of the old grille.
How do I measure for a floor vent opening?
Expose the floor opening safely, measure clear width and height in inches, write both numbers, then compare to catalog size families.
Carpet, thresholds, and flange lips are common false edges — tape the opening, not the room flooring pattern.
Measurement success does not by itself prove a given cover model is appropriate for floor placement; check the product’s intended use.
Does this method work for AC registers / vent registers?
Yes for the geometry step. “AC register,” “vent register,” and “vent cover” shoppers usually need the same opening width × height,
then a finish choice (White/Black) on a Confirmed row that matches that opening.
13. Using Size-Specific How-to-Measure Graphics
Confirmed SOKNOCKK product pages include a size-specific How-to-Measure graphic from a verified library covering dozens of unique opening-size families. After you write your tape reading, open the candidate size on the catalog and compare that module to your notes. The graphic is a second check — it does not invent a measurement for you.
Representative verified assets used in this guide include 6×4, 8×4, 10×4, 12×4, 16×4, 20×4, 24×4, and 30×14. Other Confirmed sizes follow the same module pattern on their product pages.
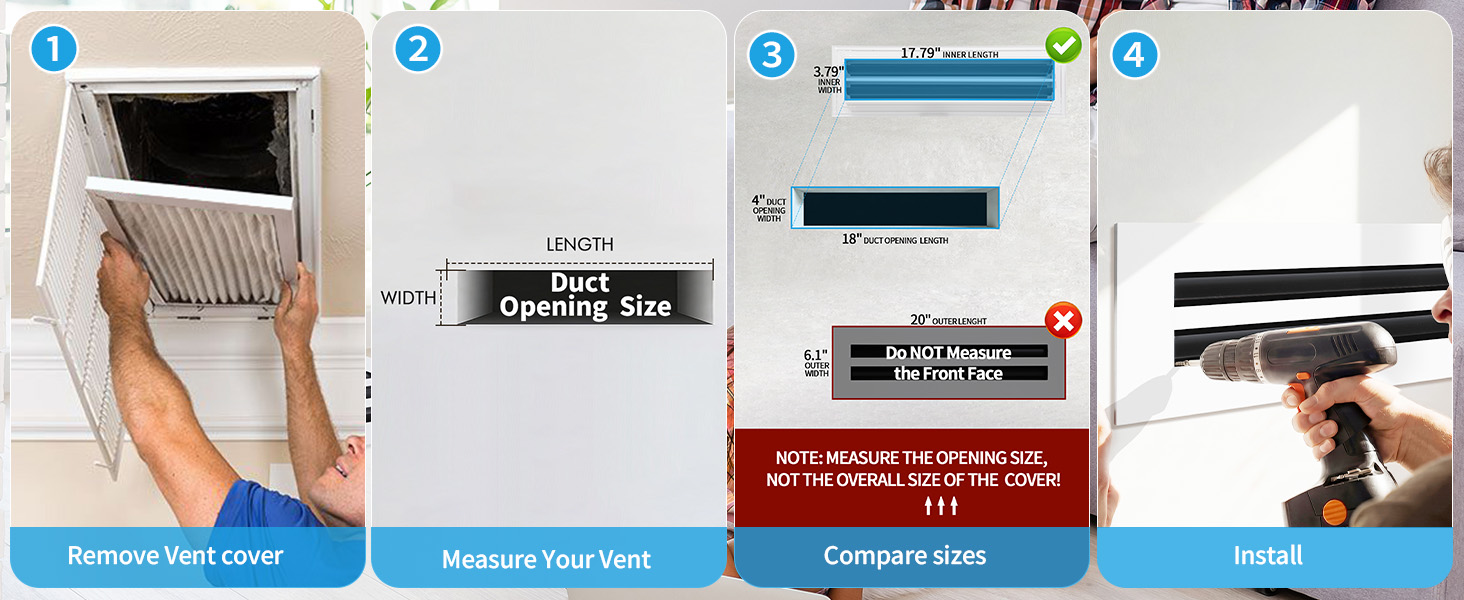
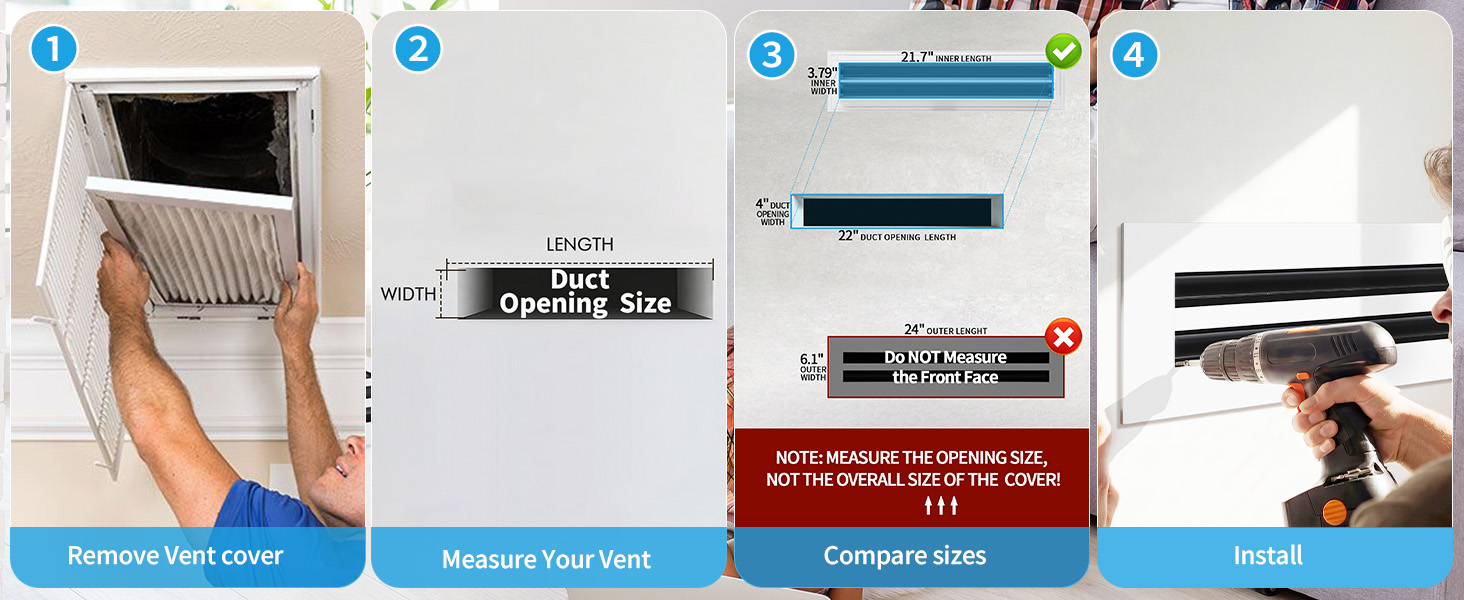
If the product-page How-to-Measure family does not look like your opening proportions, re-check your width × height order and re-measure before purchasing.
14. Decision Summary
- Prepare tools and safe access.
- Expose and measure the clear opening (not the outer frame).
- Record width × height; note any stamped label separately.
- Resolve nominal vs actual conflicts with photos when needed.
- Match the closest Confirmed catalog size, then choose finish.
- Use product How-to-Measure modules as confirmation — never as a substitute for the tape.
- Stop and ask when openings are damaged, non-rectangular, or between sizes.
Sources
- SOKNOCKK verified size-specific How-to-Measure asset set (52 unique size graphics used on Confirmed product modules).
- SOKNOCKK Confirmed catalog photography mapped by Size+Color.
- General residential practice: measure the duct/boot opening before selecting a face (homeowner HVAC replacement guidance; non-code advisory).
No lab performance claims, patents, or certifications are implied by this article.