Care guide · Aluminum linear vent covers
Cleaning Aluminum Linear Vent Covers Without Damaging the Finish
A narrow slot can collect lint just where a cloth cannot reach. The temptation is to scrub the face or push a tool between the blades. Both can make the job harder: grit can mark the finish, and a wad of debris can end up behind the visible opening. This guide gives you a controlled way to lift dirt out, clean the face and blades, and recognize when the cover needs more access.
Quick answer
Stop airflow while you work. Use a soft brush and a vacuum held at the slot entrance to collect loose dust before any wet wiping. Work from the face toward the slot opening, drawing lint outward instead of pushing it through. Then wipe accessible surfaces with a soft cloth lightly dampened with water; if needed, try a small amount of mild soap on an inconspicuous area first. Remove soap with a separate barely damp cloth and dry promptly. Do not soak the cover, scrub with abrasive pads, spray cleaner into the opening, or force an adjustable blade.
1. Before you start: identify what you can safely reach
Look at the face in good light before touching it. Separate loose surface dust from lint caught at a slot edge, sticky residue on the face, and debris that is already behind the blades. Those are different jobs. A face wipe can handle the first two; it cannot retrieve an object deep in the opening.
Set the HVAC system to off and allow the cover to stop moving air. For a high ceiling, use a stable means of access and keep both hands available. If the cover is warm, wet, loose, or damaged, wait until the condition is resolved. Place a towel below the opening and have a small vacuum with a soft brush attachment, a clean soft brush, two clean microfiber cloths, and water ready. Use a narrow vacuum attachment only if it can be held at the entrance without scraping the finish or catching a blade.
Before shifting adjustable blades, note their current position. The SOKNOCKK listing describes adjustable airfoil blades for direction and volume control, but that description does not establish that every blade should be removed or forced to its travel limit for cleaning. Move only a blade that turns freely with light fingertip pressure. If it resists, clean the visible surfaces and stop there.

2. Clean the face and blades in a controlled sequence
Lift loose dust before wiping
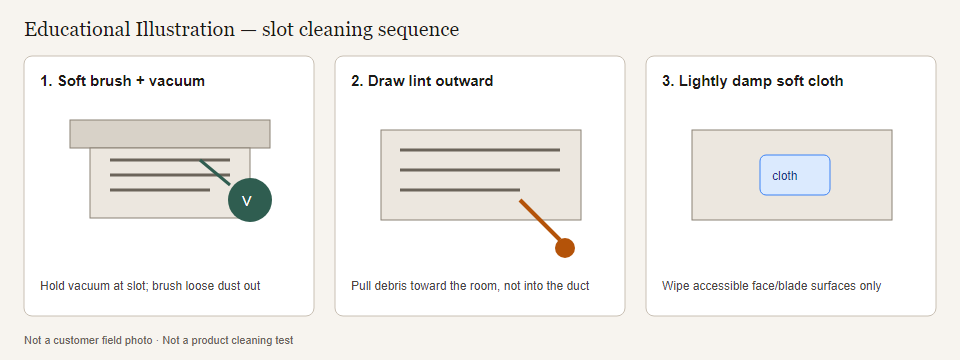
Hold the vacuum nozzle near the opening while a soft brush loosens dust at the slot edge. Keep the bristles and nozzle moving gently along the length of the slot. The vacuum should capture material as it comes free. A dry cloth alone can drag gritty dust across the finish, so reserve the cloth for after this first pass. Avoid compressed air: it can send loose debris farther into the opening and scatter dust into the room.
Draw lint out of each slot
For a lint tuft you can see, bring the vacuum close and use the soft brush to tease its exposed end toward you. Work a short section at a time. If it catches on a blade, change the angle of the brush instead of pressing harder. A clean, soft cloth corner can lift a remaining strand at the lip. Do not use a metal pick, knife, stiff wire, or abrasive pad between blades. These can mark the face, bend a blade, or drive the lint beyond reach.
Wipe the face without flooding it
Once loose material is gone, wipe the broad face with a clean microfiber cloth lightly dampened with water. Support the face so the cloth does not snag at an edge. If plain water leaves fingerprints or light soil, first test a small amount of mild soap diluted in water on a discreet spot. Wipe gently, then use a second cloth barely dampened with clean water to remove residue. Finish with a dry cloth. Apply liquid to the cloth, never directly into the slots, screw recesses, wall, ceiling, or duct opening.
Reach only the blade surfaces you can see
Wrap a clean soft cloth around a fingertip or use a soft brush to wipe an accessible blade edge. Follow the blade’s length with light pressure, keeping the cloth from wedging behind it. If a blade moves freely, a small adjustment may expose its other visible face; return it to the recorded position afterward. Avoid treating the blade assembly as a detachable part unless the exact product instructions say it is. Check that no cloth fibers remain caught in a slot before restarting airflow.
3. What to do when debris is stuck deeper
If lint is visible but will not come toward the face, stop probing. Repeated poking can compact it behind a blade. Try a second dry pass with the vacuum close to the opening while lightly brushing only the exposed edge. If that fails, the next decision is access, not more force.
A cover that can be safely removed may give you access to its back and the immediate opening. First confirm how your particular cover is mounted; the SOKNOCKK listing describes hidden screw mounting, but installed covers may differ. Photograph the blade position and fastener locations, support the cover as fasteners come free, and protect the surrounding paint. Do not pry against the finished face. The replacement guide and ceiling access guide cover removal context in more detail.
With the cover off, collect loose debris from the cover and the reachable lip of the opening using the vacuum and soft brush. Keep water away from the duct, insulation, wiring, and unfinished surfaces. A visible object deeper in the duct, a cover that will not release easily, or signs of ongoing moisture call for appropriate maintenance help. Routine dust at a register alone does not establish that the ductwork needs professional cleaning; the U.S. EPA notes that dusty registers can often be vacuumed or removed and cleaned.
4. Which method fits the dirt?
| What you see | First move | Avoid | When to stop |
|---|---|---|---|
| Loose dust on the face | Soft brush with vacuum nearby, then a gentle cloth wipe | Dragging a dry, gritty cloth across the finish | If marks remain after a light wipe |
| Lint caught at a slot lip | Brush the exposed fibers outward while vacuuming | Blowing or pushing the tuft inward | If it slips behind a blade |
| Fingerprints or light sticky film | Lightly damp cloth; patch-test mild soap if needed | Spraying liquid into the slot | If the finish changes color or sheen |
| Hardened deposit | Soften a small visible area with a damp cloth and reassess | Scrapers, abrasive pads, strong chemicals | If gentle wiping does not release it |
| Debris behind the face | Assess safe cover removal and clean from accessible side | Fishing blindly through the blades | If the cover resists or the debris is deeper in the duct |
The least aggressive method that works is the useful one. Repeat a gentle pass only while it is producing visible progress; rising pressure is a cue to change access or seek help.
5. Protect the finish, especially in bathrooms and laundry rooms
The SOKNOCKK catalog lists the product material as Aluminum Alloy and offers White and Black finish options. Checked SOKNOCKK Size+Color listing copy for this family (including 10×4 White) describes a precision powder-coated finish on aluminum. Treat that as a product-page finish statement, not as an independent laboratory certification of cleaner chemistry, coating thickness, or stain-removal performance. No cleaner-compatibility test results were verified for this article. For that reason, treat the visible finish conservatively. The Aluminum Association describes care as varying by finish type, and the Aluminum Anodizers Council warns that aggressive chemistry can harm some aluminum finishes. Neither source is a product-specific cleaning test for this cover.
Do not assume a kitchen degreaser, bleach, acidic bathroom cleaner, disinfectant, solvent, or abrasive sponge is safe just because the underlying metal is aluminum. If a cleaner is needed, begin with a tiny, diluted mild-soap test in an inconspicuous area, rinse the residue off with a separate cloth, and dry. Stop if color transfers to the cloth or the area becomes dull, tacky, or uneven.
In a bathroom or laundry room, remove condensation from the visible face when you notice it and allow the room to dry through normal ventilation. Do not let a wet cloth drip into the opening. If staining repeatedly returns, check the moisture source rather than scrubbing harder. Dark finishes may reveal pale lint and water spots more readily; light finishes may show dark grime at slot edges. Both benefit from the same gentle sequence.
6. Confirmed product examples and the path to a replacement
These catalog photos show the SOKNOCKK 10×4 size in its confirmed White and Black options. They help you see the visible face and slot geometry. They do not prove that another size has identical proportions, dimensions, finish behavior, or cleaning access.
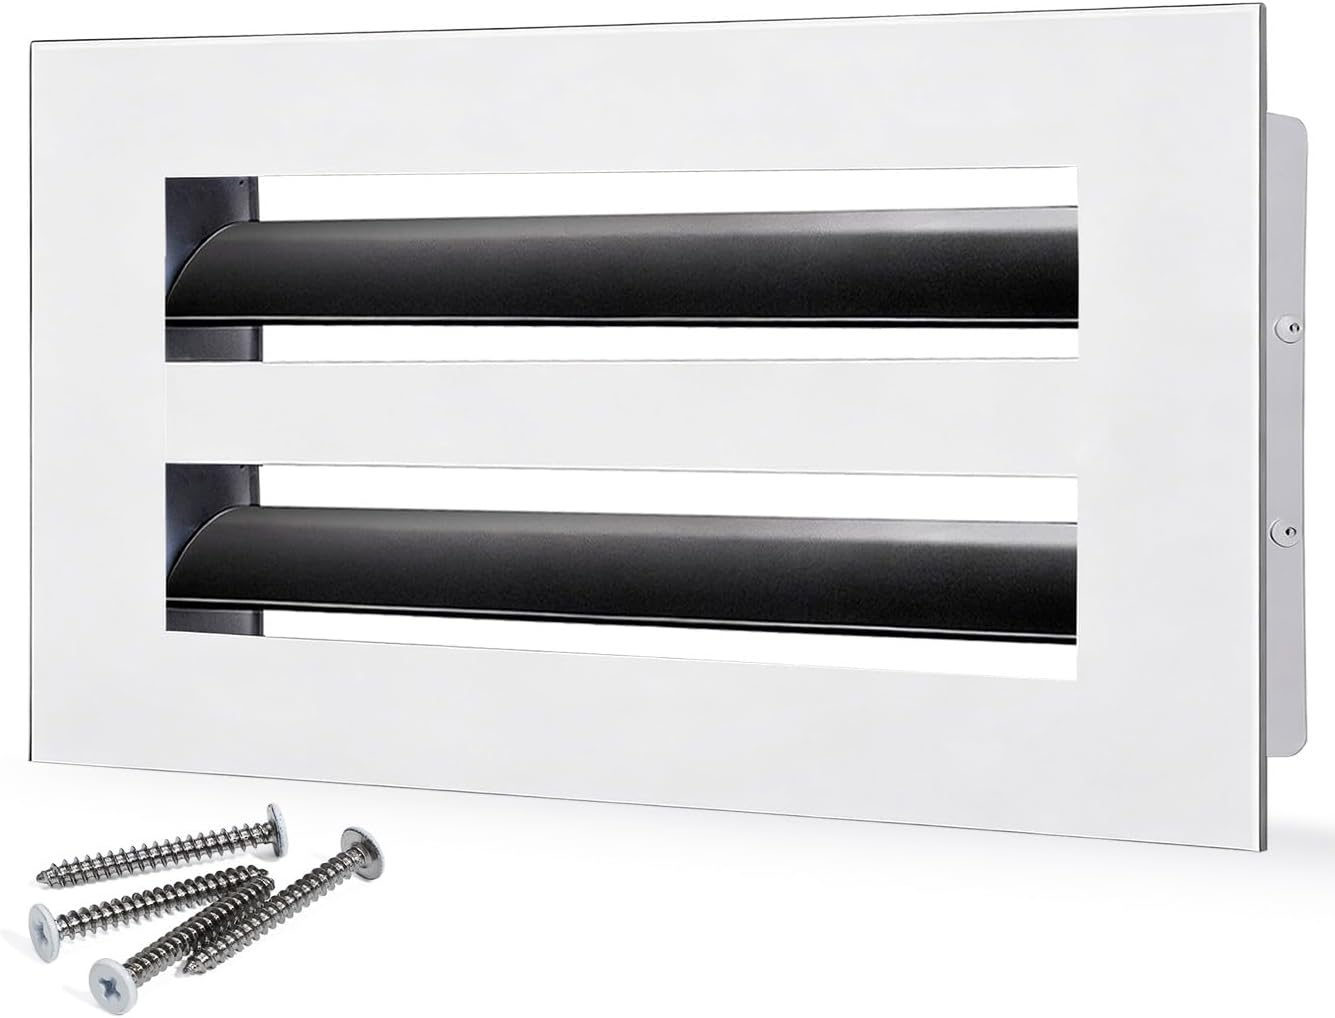
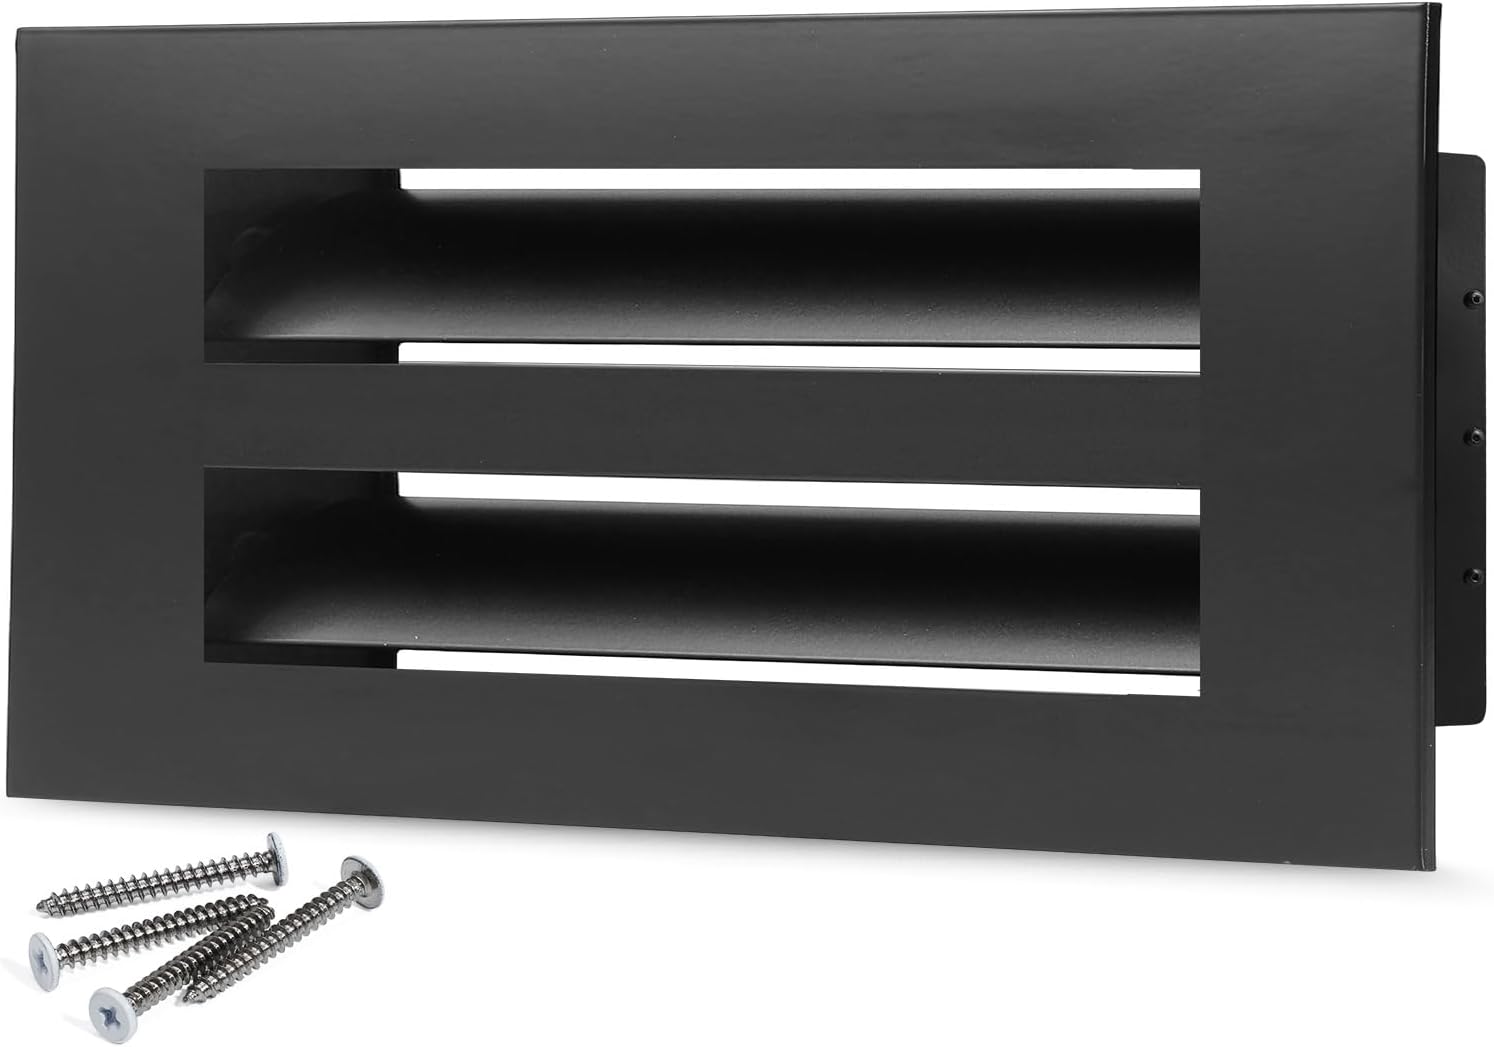
If the existing finish is scratched, flaking, or still visibly damaged after gentle cleaning, inspect the Modern AC Vent Cover listing for the chosen Size and then Color. Check its published face and neck dimensions against your opening before ordering. The listing states that the neck inserts into the opening, but a photo of a 10×4 cover cannot verify another variant’s fit. Use the opening measurement guide for the size decision and the White versus Black guide for room finish selection. For the full range, see vent covers.
7. Buyer checklist before cleaning or replacing
- Identify whether the dirt is on the face, caught at a slot lip, or behind the cover.
- Switch airflow off; arrange stable access and protect the floor or furniture below.
- Gather a soft brush, vacuum, clean microfiber cloths, water, and optional mild soap for a spot test.
- Record the position of any adjustable blades before moving them.
- Vacuum and brush loose dust outward before the first wet wipe.
- Apply moisture to the cloth only, remove any soap residue, and dry the face promptly.
- Stop if a blade resists, the cover will not release, or gentle cleaning changes the finish.
- If replacement is needed, compare the opening and the selected Size, then Color, in the listing.
8. FAQ
Can I wash an aluminum linear vent cover under a faucet?
A full rinse is difficult to control around adjustable blades, concealed fasteners, and any parts you cannot dry immediately. For routine cleaning, use lightly damp cloths on accessible surfaces. If you remove a cover, follow its specific care instructions and keep water out of the duct opening.
Should I use compressed air to clear the slots?
No. Air can drive lint behind the blades or disperse dust into the room. A soft brush paired with a vacuum at the slot entrance gives you a better chance of collecting debris as it loosens.
Can I use a toothbrush or a cotton swab?
A clean, very soft brush may help at the slot edge if it does not scrape the finish. Cotton can snag and leave fibers, especially around blade ends. Work outward and stop if the tool catches or requires force.
What if a stain remains after mild cleaning?
Do not escalate immediately to a stronger chemical or abrasive pad. Check whether it is a deposit sitting on the surface or a change in the finish itself. If a small, gentle test does not lift it, seek product-specific care guidance or consider replacement if appearance matters.
How often should I clean the cover?
Inspect it during normal room cleaning and remove visible dust before it builds up at the slot edges. The useful interval depends on room use and local dust. There is no fixed cleaning schedule or finish-life claim established for these variants.
Can I remove the cover to clean behind the blades?
Only if you can identify the mounting method and safely support the cover. Do not pry on the face or force fasteners. Clean the accessible back and opening lip; deeper duct concerns are a separate maintenance job. For reinstallation, consult the installation basics.
Care context: The Aluminum Association, Care of Aluminum; Aluminum Anodizers Council, anodized aluminum FAQ; U.S. EPA, Should You Have the Air Ducts in Your Home Cleaned?. These are general care references, not SOKNOCKK finish tests.